
The Degu project sets out to standardise the core set of technologies that enable the flow of IoT data from edge devices, up to the cloud and back again. See the Degu Project Introduction for a full overview of the project.
This tutorial shows how to quickly and easily create your first simple IoT system with Degu, collecting real world sensor data, relaying it up to the AWS cloud and sending email notifications with the collected data.
By following this tutorial, you’ll cover everything you need to get started with Degu, including how to:
Connect a Degu Gateway to the Cloud with AWS
Register a Degu Sensor Unit with the Degu Gateway in order to send sensor data to the Cloud
Load MicroPython code onto the Degu Sensor Unit to read data from a particular sensor type.
Set up AWS cloud services in order to receive sensor data update notifications via email
By the end of the tutorial, you’ll have a strong foundation to build on further for creating more complex IoT systems.
Requirements
Hardware
1 x Degu Sensor Unit
3 x AA batteries
1 x Degu A6 LAN gateway unit
1 x Grove Starter Kit for Degu
Development PC
Ethernet cable connected to the internet
Software
An AWS account with access to the following services:
Identity and Access Management (IAM)
IoT Core
Simple Notification Service (SNS)
Experience
A reasonable degree of comfort with the following is assumed:
Using a serial communication program such as minicom to access USB serial port devices
Using AWS services
System Overview
In this example our Degu IoT system will consist of the following components:
A Degu Sensor Unit as an edge device
A Degu Gateway (A6 LAN in this case) to upload sensor data to the cloud
The cloud component, utilizing these three AWS services:
AWS IAM
AWS IoT Core
AWS SNS
Step 1 - Create an AWS User for Degu
The Degu Gateway uses AWS IoT Core for its connection to the cloud. In order to connect the Degu Gateway to AWS IoT Core, we first need to set up an IAM user.
To setup IAM user permissions for Degu, please refer to the Degu Gateway Set Up Guide - Create IAM User section.
Once you’ve successfully created the IAM user with appropriate permissions, you’ll have the two necessary credentials needed to access AWS IoT Core:
Secret Access Key
Access Key ID
Step 2 - Set up Degu Gateway
Next, connect the power cable, USB serial conversion adapter and ethernet cable as appropriate. Also make sure that the USB serial conversion adapter is connected to your development PC and the ethernet cable is connected to a network with internet access.
Power the Degu Gateway on and use your preferred serial communication program (such as minicom) on your development PC to connect to it via the USB serial conversion adapter.
As an example, if using minicom on a Linux PC, and you have just one USB serial device connected, you would start minicom with the following command:
$ minicom -D /dev/ttyUSB0Successfully connecting to the Degu Gateway will result in a request to log in - use root for both login and password.
Next, ensure that all software packages on the Degu Gateway are the latest version with the following command.
# apt-get update && apt-get -y upgradeAfter successfully updating the software packages, next set up the AWS IoT configuration in /etc/coap-mqtt/mqttinfo.json
using your preferred text editor (such as VI). For example:
# vi /etc/coap-mqtt/mqttinfo.jsonThere are four items that need to be filled in the config file:
aws_endpoint: "xxxxx.iot.ap-xxxxx-x.amazonaws.com"
You can find this in AWS IoT console -> Settings -> Custom endpoint
secretaccesskey: “xxxx”
Which we created in previous step (accessible via the downloaded CSV).
accesskeyid: “xxxx”
Which we created in previous step (accessible via the downloaded CSV).
region: “xxxx”
AWS region key which contained in aws_endpoint above (after xxxxx.iot before amazonaws.com).
Now reboot the device to make sure all the services are ready to go.
# rebootAfter the system has rebooted, login in and run the gateway registration command:
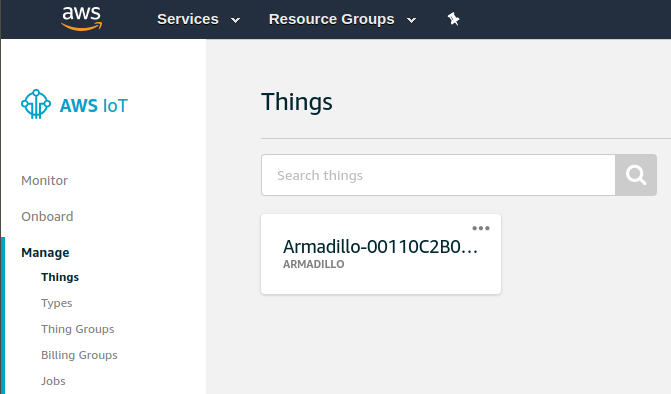
# degu-manager --register-gwVerify that the Degu Gateway has been successfully registered on AWS IoT Core by:
Opening AWS IoT console
Going to Manage -> Things.
There should be a ‘Thing’ called “Armadillo-xxxx” added there where xxxx is the MAC address of Degu Gateway.
Step 3 - Register Degu Sensor Unit with Gateway
Now we’ll quickly register the Degu Sensor Unit on the Gateway as well.
On the back of the Degu Sensor Unit is a sticker which has the MAC address of the device. To register the unit, run the following command in the serial console, substituting “xxxxxxx” with the unit’s MAC address:
# degu-manager --register-degu xxxxxxxIf the command was successfully executed, you will be able to see a ‘thing’ in the AWS IoT console, with the above MAC address as it’s ID.
Congratulations, you’ve successfully connected the Degu Gateway and a Degu Sensor Unit to the AWS IoT service.
Leave the Degu Gateway powered on and connected to the internet for the subsequent steps.
Step 4 - Connect Grove Module to Degu Sensor Unit
For our IoT system, we’re using a combined temperature & barometric BMP280 Grove module supplied in the Grove Starter Kit for Degu.
From the Grove module manual we know the sensor is to be connected as an I2C slave to Degu Sensor Unit’s I2C bus.
Thus before proceeding, we need to determine which port on the Degu Sensor Unit has I2C, and connect the sensor unit to it. From the Degu hardware connection diagram, you can find the correct I2C capable plug to connect to (green on the pin out diagram).
Step 5 - Load MicroPython Sample Code
Next we’ll load the MicroPython sample code necessary to access the barometric pressure / temperature Grove module we’ve just connected.
Connect the Degu Sensor Unit to your development PC via the USB cable. The Degu unit will present as a mass storage device.
On the device you’ll see a file called main.py. Open main.py with your choice of text editor, and replace the contents with the sample code to run the BMP280, which you can find here. Make sure to copy in the raw text of the sample code only.
Save the file.
The default update frequency is once every minute, which you can edit by selecting the default ‘Operating Mode’ in the __init__
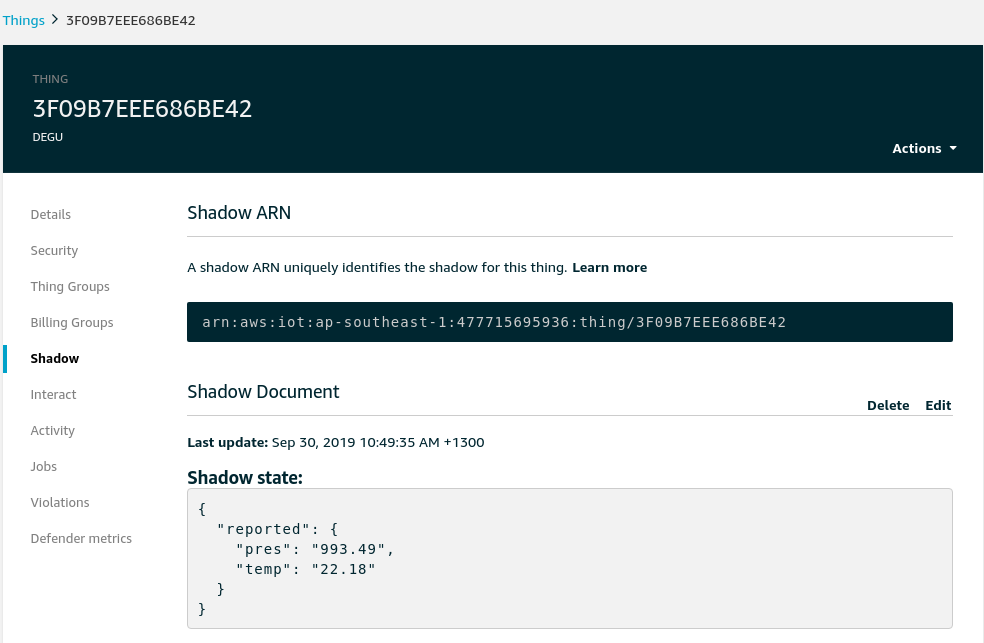
Step 6 - Verify AWS IoT Thing Shadow Status
Reboot the unit by powering it off and on again.
The Degu Senor Unit should now start reporting the sensor data to AWS IoT via the Degu Gateway.
Verify that the unit has successfully done this by:
Opening AWS IoT console
Go to Manage -> Things.
You should see a Thing for the Degu Sensor Unit. Click on it.
Go to ‘Shadow’
The shadow document should indicate that it has been updated in the last few minutes, and the shadow state should show the barometric pressure and temperature in a JSON format.
Step 7 - Setup AWS SNS
No IoT system is complete without reporting, so our last step is to set up AWS SNS to send ourselves an email notification whenever the Shadow document is updated.
First follow these instructions to set up an AWS IoT core rule to send message data to an SNS topic, after which we should be able to see the newly created topic in the AWS SNS console:
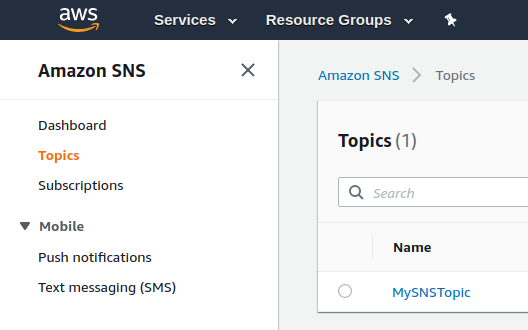
Finally, create a subscription to the ‘topic’ by
Clicking on ‘Subscriptions’ -> ‘Create subscription’
Select the topic ARN created in the previous setup when setting up SNS
Set Protocol: Email
Set Endpoint: your email address
Click the ‘Create subscription’ button.
Congratulations, that’s it. You’ve created your first simple IoT system with Degu. If everything has gone well, you should now get sensor data sent to you every minute.
If you’re ready for the next step, you can check out the next tutorial, where we replace AWS SNS with Elasticsearch and visualise our Degu Sensor Data using Kibana.