
In the second tutorial, Visualizing Degu Sensor Data with Elasticsearch, we set up an Elasticsearch connected Kibana dashboard displaying aggregated live temperature and barometric pressure data from a Degu Sensor Unit.
Collecting data from the sensor and displaying it live data on a dashboard is a good start to covering the data collection and visualisation aspects of an IoT project. Next we’ll extend our system by integrating an actuator, in order to make a closed loop IoT system which is able to respond to environmental changes.
In this tutorial we’ll create a soil moisture monitoring and notification system. We'll be using a Grove soil moisture sensor to collect data from one Degu unit, then sending the data to an AWS Lambda function. The Lambda will contain some simple logic to determine whether the soil is dry enough to warrant turning on a buzzer on another Degu unit to act as a notification mechanism. We’ll cover:
Setting up one Degu unit with a moisture sensor and connecting it to the gateway.
Setting up another Degu unit with a buzzer and also connecting it to the gateway.
Creating an AWS Lambda function with logic to turn the buzzer on and off according to the moisture reading.
Creating an AWS IoT Rule to pass through the moisture reading to the AWS Lambda function.
By the end of this tutorial, you will have built a simple closed loop IoT system which covers data collection, cloud side decision making, and an actuator which responds to the environment.
System Overview
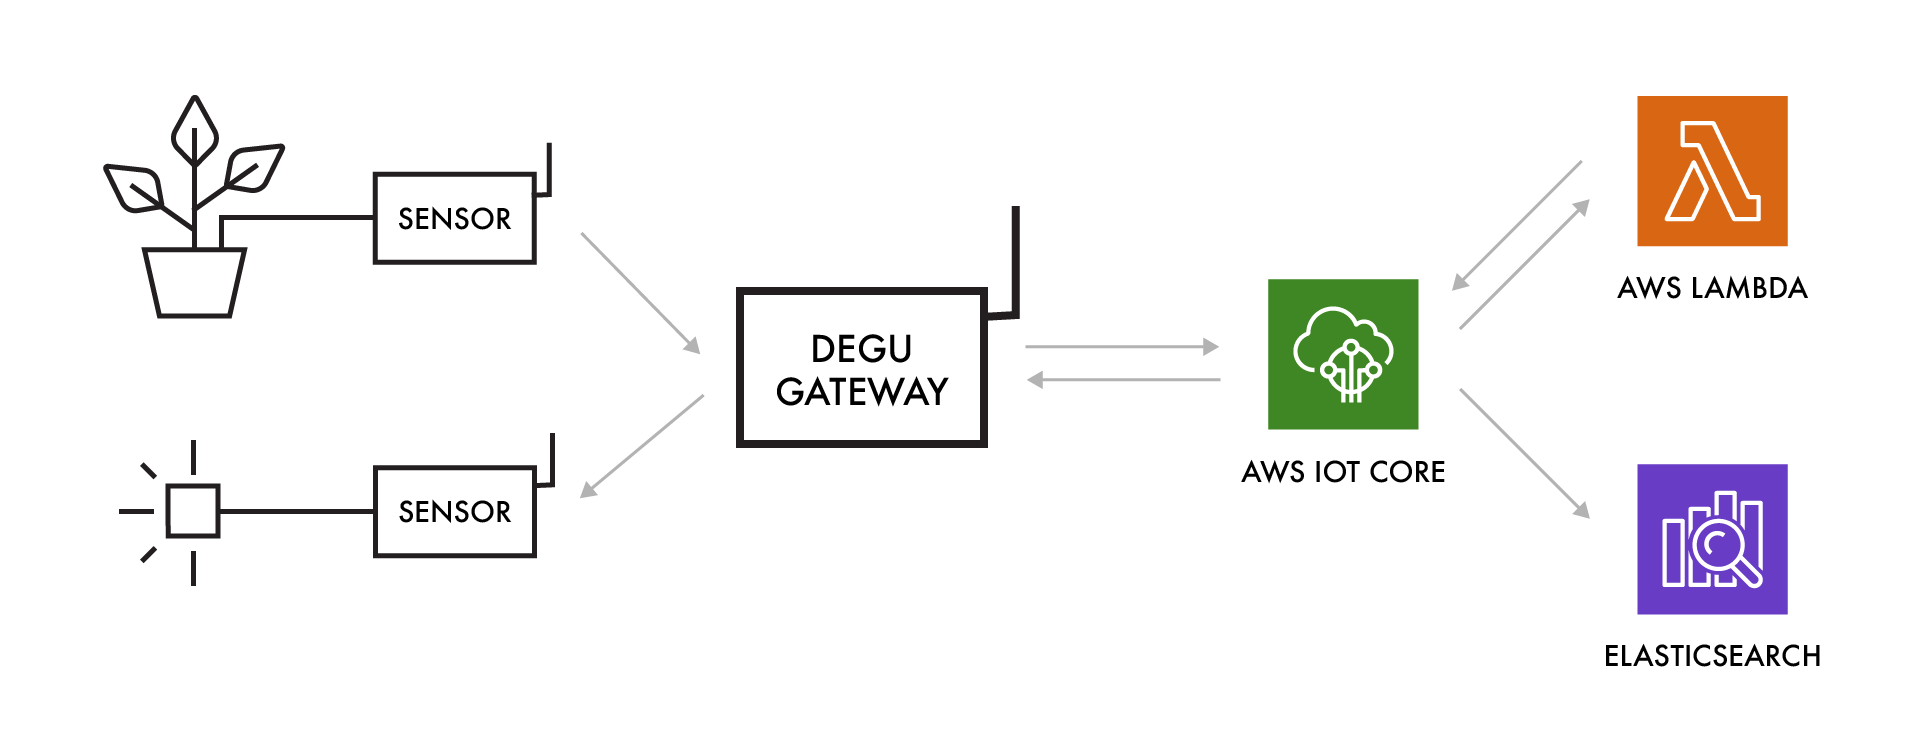
Building on the existing system from the previous tutorial, your IoT system will currently have the following components:
A Degu Sensor Unit as an edge device with Grove I2C temperature sensor .
A Degu Gateway (A6 LAN in this case) to upload/download sensor data to/from the cloud.
The cloud component, utilizing these three AWS services:
AWS IAM
AWS IoT Core
AWS Elasticsearch & Kibana
In this tutorial we’ll be:
Adding another Degu Sensor Unit with buzzer
Adding a soil moisture sensor to our existing Degu unit
Integrating an AWS Lambda function into our system.
Let’s have a quick look at AWS Lambda functions.
AWS Lambda
AWS Lambda is a serverless service provided by AWS, which lets you run code without provisioning or managing servers. You pay only for the compute time you consume - there is no charge when your code is not running. Lambda supports many programming languages, however in the spirit of Degu we’ll be using Python.
For more info on AWS Lambda, see the Lambda service info.
Let’s get started with the tutorial.
Step 1 - Add Degu Unit With Moisture Sensor
In order to be able to collect soil moisture data, we’ll first connect a moisture sensor to a Degu unit and load the corresponding MicroPython script for it.
If you only have the Degu Grove Start Kit, then you can freely replace the soil moisture sensor with another input module, such as the temperature, humidity and barometric pressure or light sensor modules, and make adjustments to the tutorial code as needed.
Connect Grove Moisture Sensor to Degu Sensor Unit
From the Grove module manual we know the moisture sensor needs to be connected to an analog port on the Degu unit.
From the Degu hardware connection diagram, we can see that there are three AIN ports that can be used to connect to analog signal devices. In this case we will choose analog port 1 which can read analog signals using ADC 0.
Load MicroPython Sample Code
Next we’ll load the MicroPython sample code necessary to access the moisture sensor we’ve just connected.
Following the same procedure we introduced in the first tutorial, connect the Degu Sensor Unit to your development PC via a USB cable and add the moisture sensor sample code to the existing main.py file.
The default update frequency is once every 30 seconds - feel free to adjust this as you see fit.
Step 2 - Add Degu Unit with Buzzer
To be able to emulate an alarm, we’ll connect a Grove buzzer module (included in the Grove Starter Kit) to the other Degu unit and write some simple MicroPython code to poll the shadow data from AWS IoT. The shadow data will contain the state value for the buzzer on/off, as set by the Lambda function.
Connect Grove Buzzer Module to Degu Sensor Unit
From the Grove module manual we know that the buzzer module should be connected to a digital port on Degu unit.
From the Degu hardware connection diagram, we can see that there are 2 DIO ports on the unit which can be used to connect to digital signal devices. We’ll choose digital port 1 to activate the buzzer, via pin 8 on GPIO_1 (P1.08) as per the connection diagram.
Load MicroPython Sample Code
Next load the MicroPython code necessary to poll the shadow from AWS IoT and turn the buzzer on/off. Connect the Degu Sensor Unit to your development PC via the USB cable, then replace the contents of the main.py file using the code below:
from machine import Pin
  from machine import Signal
  import zcoap
  import time
  import ujson

  if __name__ == '__main__':
      path = 'thing/' + zcoap.eui64()
      reported =

      buzzer = Pin(('GPIO_1', 8), Pin.OUT)

      while True:
          addr = zcoap.gw_addr()
          port = 5683
          cli = zcoap.client((addr, port))

          shadow = cli.request_get(path)
          desired = ujson.loads(shadow)['state']['desired']
          if (desired['buzzer'] == 'on'):
            buzzer.on()
            time.sleep(1)
          buzzer.off()
          cli.close()
          time.sleep(30)
The code is quite simple - it polls shadow data from AWS IoT once every 30 seconds. If it sees that state.desired.buzzer is on, it turns the buzzer on for one second. It will continue to turn the buzzer on for one second every 30 seconds until state.desired.buzzer changes to off.
As covered later, state.desired.buzzer is set by the Lambda function, depending on the reported soil moisture sensor value of the first Degu unit.
Step 3 - Register New Degu Unit on Gateway
After loading the MicroPython code onto your new Degu unit, register it on the gateway so it can connect to the existing thread network. Following on from the previous tutorial, one of the Degu units should already be registered.
Connect to the serial port on the gateway and run the command below to register the Degu unit, where the xxxxxx is the serial number of the degu unit to be added (see the back of the Degu sensor unit):
# degu-manager --register-degu xxxxxxxIf you need a refresher on how to connect to the gateway, see Step 2 of the first tutorial.
Step 4 - Create AWS Lambda Function
Now it’s time to create the AWS Lambda function that will receive the moisture reading from the first Degu unit and update the buzzer state of the second Degu unit’s shadow state accordingly.
Create IAM Role
Before proceeding, you will need to create an IAM Role for the Lambda function to access AWS IoT and the logging system.
To create the role:
Open the AWS IAM console.
Click “Roles” on the left side menu.
Click “Create Role”.
Select “AWS Service”.
Choose “Lambda” under ”Choose the service that will use this role”.
Click “Next: Permissions”.
Choose “AWSIoTDataAccess” and “AWSIoTLogging” from the list when attaching permissions policies.
Click “Next: Tags”.
Click “Next: Review”.
Set “Role name” to lambda_access_iot.
Click “Create role”.
Create Lambda Function
To create a Lambda function:
Open the AWS Lambda console.
Click “Functions” on the left side menu.
Click “Create function” on the top-right corner.
Select “Use a blueprint”.
Input “hello” in the search box.
Click “hello-word-python” displayed in the search result.
Click “Configure”.
Select “Use an existing role” in Execution rule.
Select lambda_access_iot from “Existing role” list which you created above.
Click “Create function”.
Modify Function Code
- In the function code page, replace the Lambda function code with the code below:
from future import print_function

import json
import boto3

def lambda_handler(event, context):
    buzzer = 'off'
    if (event['moisture'] < 500):
        buzzer = 'on'

    # Parse the JSON message
    eventText = json.dumps(event)

    # Print the parsed JSON message to the console; you can view
    # this text in the Monitoring tab in the Lambda console or in #
    # the CloudWatch Logs console
    print('Received event: ', eventText)

    # Create an SNS client
    iot = boto3.client('iot-data')

    payload = json.dumps({'state': { 'desired': { 'buzzer': buzzer } }})

    # Publish a message to the specified topic
    response = iot.update_thing_shadow(
        thingName='xxxxxxxxxxxxxxxx',
        payload=payload
    )

    print(response)
The function checks the incoming event, if it contains the key ‘moisture’ and the value of it is less than 500 it sets the buzzer state to ‘on’, otherwise it sets it to ‘off’. It then uses the boto3 API to update the buzzer state in the shadow of the Degu unit connected to buzzer.
- Replace 'xxxxxxxxxxxxxxxx' in the code with the serial number of the Degu unit connected to the buzzer module.
- Click “Save”.
You now have a Lambda function that can receive an event from one device and modify the shadow state of another device.
Step 5 - Add AWS IoT Rule
The last step is to define an AWS IoT rule that passes the moisture sensor data to the Lambda function created in the previous step.
To create the AWS IoT Rule:
- Open the AWS IoT console.
- Go to Act, click on 'Create a rule'.
- Set the rule 'Name' to 'report_moisture'.
- Under the ‘Rule query statement’ field, replace the default contents with the following:
SELECT topic(3) as thing, state.reported.moisture as moisture FROM '$aws/things/+/shadow/update/accepted'- Under the ‘Set one or more actions’ heading, click the ‘Add action’ button.
- From the list, choose ‘Send a message to a Lambda function’, then click ‘Configure action’.
- Select the ‘Function name’ to ‘moisture_alarm’.
- Click 'Add action'.
- Click 'Create rule'.
The moisture sensor data should now be sent to the AWS Lambda function you’ve just set up.
If you insert the soil moisture sensor into a nearby pot plant, you will now have a cloud connected pot plant soil moisture monitoring and notification system using two Degu units, with the control logic hosted in an AWS Lambda function.
Congratulations, by working through these three tutorials, you should now be comfortable loading MicroPython code onto Degu units, registering them to a gateway, and sending data to the cloud and back, while also gaining a basic understanding of visualising data using Elasticsearch and Kibana, and implementing controlling functions via Lambda functions.